How to set up event reminders in ActiveCampaign
If you run events, you’ll know that staying in people’s inboxes upon and after registration is key to ensuring that:
they show up
they’re prepared and receive the most value out of your event
they’re more likely to take any post-event CTA you ask of them
That’s where a well-crafted event email series comes in.
This guide will show you how you can set up your own event registration confirmation, reminder, lead-up, and post-event emails, using ActiveCampaign.
These methods are based on my work with clients who run recurring intro sessions each month with ~50 attendees, all the way up to once-a-year summits for thousands of attendees.
Click the links below to dive to a specific section:
Otherwise, we’ll dive in -it all starts with the registration confirmation email.
By the way - looking for an experienced ActiveCampaign expert who can set this all up and/or train your team on how to do it? Check out my services page.
Setting up a registration confirmation email
No matter what you’re hosting, the first step is ensuring that everyone who registers receives a confirmation email containing the details about your event. To do this, you’ll create an automation (in ActiveCampaign, click the “Automation” image on the blue left sidebar, then click “Create an automation” in the top-right).
Triggering the automation
Every automation starts with a Trigger, which is simply what indicates to ActiveCampaign that someone has registered.
Depending on how people register for your event, you’ll choose the appropriate trigger. Common triggers for event registration include:
Submits a form: use this for an ActiveCampaign form embedded on your website
Subscribes to a list: use this if a registration form subscribes the contact to a list
Tag is added: use this if a registration form tags the contact
Makes a purchase: use this if registration is handled by your connected eCommerce store
Eventbrite is created: use this if registration is handled via Eventbrite
Note: if you’re using a “Subscribe to list” trigger, create a new list for each event. This is because a contact will not trigger the automation if they’re already on that list.
**automation showing all above triggers (except Eventbrite) as options
Click to enlarge
Extra note if you use the Purchase or Eventbrite trigger
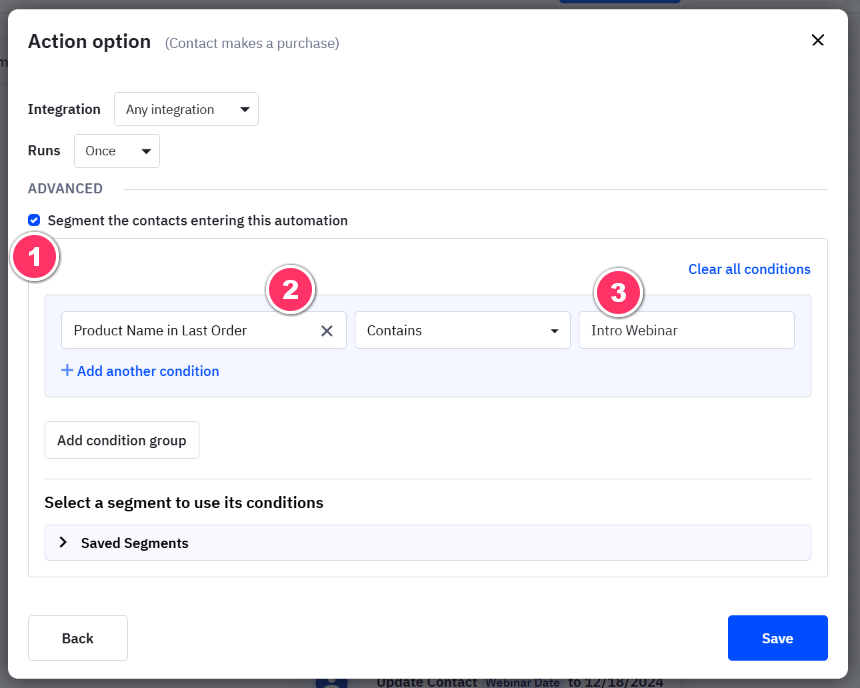
Note that when you pick the “Makes a purchase” trigger, by default it will trigger for any purchase someone makes in your store. To ensure that this trigger only works for purchases of your event, set it up as follows:
1: check the “Segment” box. 2: choose the “Product Name in Last Order” condition. 3: Add the name of the product that is purchased
Add a subscribe step
If your trigger is not a “Subscribe” trigger, then you should add a Subscribe action to your automation. This is because contacts cannot receive any ActiveCampaign emails until they’re subscribed to at least one list.
And, no matter what your trigger is, you may also want to subscribe them to your regular communications (e.g. your newsletter).
To subscribe a contact, simply add a “Subscribe to list” action to your automation, like this:
Note: if you do plan to add your contact to your other communications, I recommend making it clear in your event registration form e.g. “by registering you agree to receive reminders about this event, as well as other updates and promotions from us. You can unsubscribe at any time”.
Add the confirmation email
Next, add the confirmation email to the automation with a “Send an email” step. Here you’ll set up your email just like sending a regular email campaign.
The confirmation email should contain the details of the event: time, date location, etc, as well as any instructions for preparing for the event.
Tip: an “Add to calendar” button makes it easy for your recipients to add your event to their calendar without worrying about timezones. If you use an event registration platform, they may provide this for you. Otherwise there are online tools that can help (e.g. https://calndr.link/ which is free).
If you added a subscribe step to your newsletter as mentioned above, I recommend also mentioning that in this confirmation email e.g. “If you’re new to us, you’ll also be receiving our regular newsletter”.
Set up the event reminder emails
Now, here’s where my advice might differ from what you were thinking. See, many people think that an event or a webinar should have automated reminder emails. However in my experience, you’ll run into less headaches if you simply send your event emails as campaigns.
Later in this guide, I’ll walk through how to set up automated reminders for those who need it, but in most cases, I recommend campaigns as the simplest way to implement reminders.
To do this, simply set up a series of campaigns as you usually would. To make sure you only send event campaigns to those who registered, you’ll need to set up a segment in ActiveCampaign.
Setting up your event segment
If you used a “Subscribes to a list” trigger
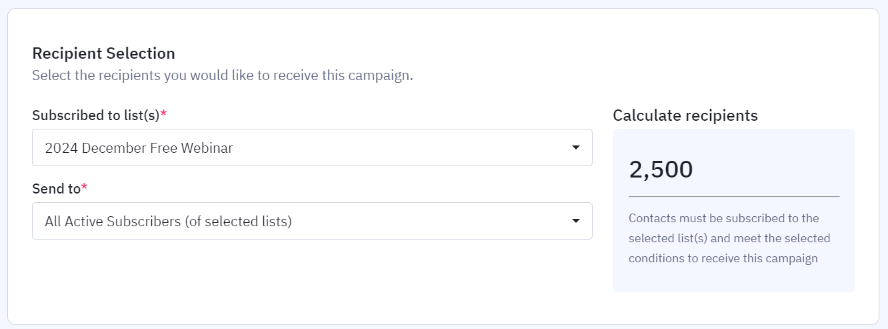
If you track registrations via subscriptions to a list, then segmenting your event-based campaigns is super simple - simply choose that list in the “Recipient Selection” panel when you set up your campaign:
Any other trigger
If you use any other trigger for registrations, you’ll need to set up a “segment”. Although you can do this while building a campaign, I recommend going to Contacts -> Segments, adding the conditions there, and then saving it. That way you can simply search and use the same segment for all of your event-related campaigns.
To create and use segments in your campaigns, check out my video:
Video on how to create ActiveCampaign segments
The condition(s) you use for your segment will depend on how you’ve triggered your automation.
For example, the image below shows the condition to add if a contact is tagged when they register:
Then when you go to schedule an event-related campaign, simply select that segment in the Recipient Selection panel (you’ll also need to select one or more lists first - for the simplest option, choose “Select all”):
Frequency and content of reminders
The frequency of reminders you should send out is up to you. For an online event, I’d recommend at least the following:
24-hour reminder
2-hour reminder
5-minute reminder
However, this series of emails isn’t just for reminding people about the event - it’s also a chance to educate and prepare them, and to market your business and products along the way.
So feel free to add more emails. For example, if your event is far away (e.g. months) or if there’s a lot for attendees to prepare, it might be worth checking in every couple of weeks to ensure you stay top of mind and keep them invested in the event.
You’ll want to strike a balance that works for you by considering the amount of effort required vs the reward. Reminder emails are relatively easy to copy and paste with minor modification, but educational or marketing emails will take more effort to write. If the event is complex, has a high ticket price, or a high registrant count, the more work you put in, the better the return on investment.
Also, note that not every registrant will receive all of these emails (for example, someone who registers 1 minute after the event starts will only receive the automated confirmation). So try to ensure that all critical information for attending the event is in the automated confirmation email.
Tip: you can add a link to an event page on your website to the confirmation email. This way you can keep the webpage updated with the latest info without having to update the confirmation email
Post-event emails
Once the event wraps up, I recommend sending at least two more emails. These are your opportunity to strike while the event is still fresh in your attendee’s minds:
thank them for attending the event
provide an event recording (if there is one)
promote next steps (e.g. recommending one of your product/course/offerings that neatly dovetails with what they got out of the event)
ask for event feedback
And you’re done!
This is everything you need to set up emails for a once-off event. However, if what you’re looking for is an automation that will save you time from hosting the same event over and over, keep reading…
How to fully automate a recurring event
If you’re hosting a recurring event, then you can make more efficient use of your time by automating the entire event email series.
In particular, the automation I’ll be walking through below is most efficient if your recurring events are very similar to each other, and thus the event emails will be mostly identical from event to event.
For example, one of my clients hosts a monthly free webinar to demo their product - since the event follows the same format each time, the emails don’t need to change other than some small details like date, time and join link.
Though this method took more up-front investment compared to the simpler method I detailed above, it now takes my client just 15 minutes to set up each event, freeing up a huge chunk of time.
There are also other reasons you may need to use an automation. For example, if you plan to send transactional emails (e.g. via Postmark), or you have automation steps that need to action at a specific time/date. The guide below will help you in those cases as well.
Here’s a full picture of the automation I’ll be walking you through (it might look daunting, but don’t worry, I’ll be explaining each step below):
Click image to enlarge
Creating a trigger
Depending on what kind of event you’re running and how you’re collecting registrations will help you choose which trigger to use.
If you expect each person will only ever attend your recurring event once, then you can use a “Subscribe to list” trigger.
On the other hand, if you expect people to register to these events multiple times, the “Subscribe to list” trigger won’t work, because it can only ever be triggered once per list for each subscriber.
In this case, you’ll need a trigger that can occur multiple times. Most of the automation triggers that you can browse in ActiveCampaign should work, with some things to keep in mind.
Important settings to make a trigger recurring
In order to make sure a person can enter the automation more than once (for example, once for an event on the 13th of June, and then again for an event on the 8th of August), we need to make it possible for a trigger to be triggered multiple times.
However, we also want to make sure that people aren’t entered into the automation multiple times for the same event, as this will result in them receiving duplicate emails.
To achieve this, there are two settings you should update when you set up a trigger for this automation:
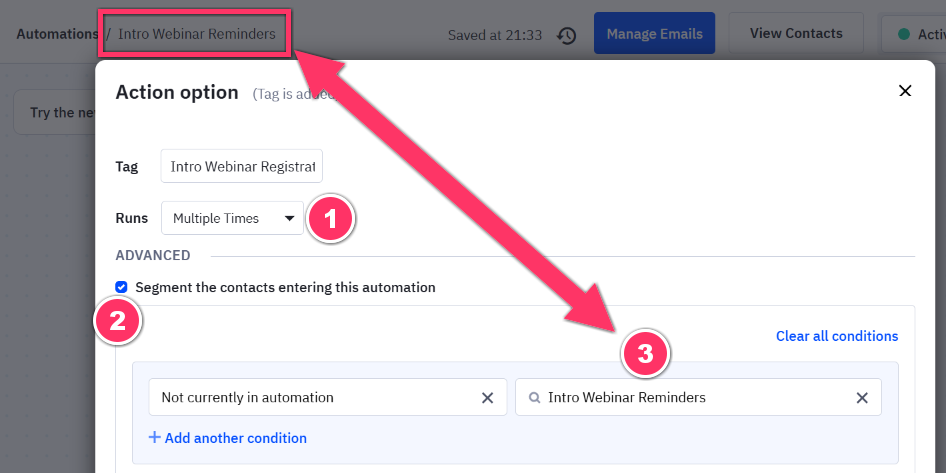
Set “Runs” to “Multiple Times”
Click the checkbox next to “Segment the contacts entering this automation”, and add a condition: “Not currently in automation” - then find the name of your current automation from the search box
For example, like this:
Note how the field next to “Not currently in automation” matches the name of this automation
Example of setup if you trigger on Purchases or Eventbrite registration
If you sell tickets to your event via your connected eCommerce store or Eventbrite, then simply follow the instructions above, remembering to add in the “Product Name” condition as well.
Here’s how it should look:
How to set up a trigger purchase. 1: choose the “Makes a purchase” trigger. 2: set to run multiple times 3: check box to apply filtering 4: add segment conditions
Extra step required if you trigger based on a Tag
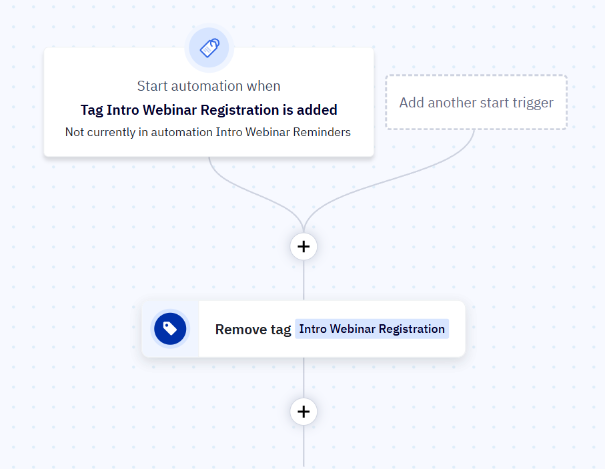
If you plan to trigger this automation when a contact is tagged in ActiveCampaign, then you need to add an extra step to your automation. This is required because if a contact already has your event tag, adding the tag again won’t trigger the automation again.
To fix this, add an action step immediately after the trigger that removes the tag that was just added. This will enable contacts to enter the automation multiple times (remember to modify the trigger in the same ways as detailed above).
Setting event date and time variables
Now that your trigger is set up, we need to add steps to tell the automation when your event will be, as well as any other details that might change each time the event runs (e.g. location, join link).
To make this as efficient as possible, we’re going to store these as custom fields in a contact’s record. Then, the automation will pull from these fields to know when to send each email, and to automatically update the contents of each email.
Setting the event date
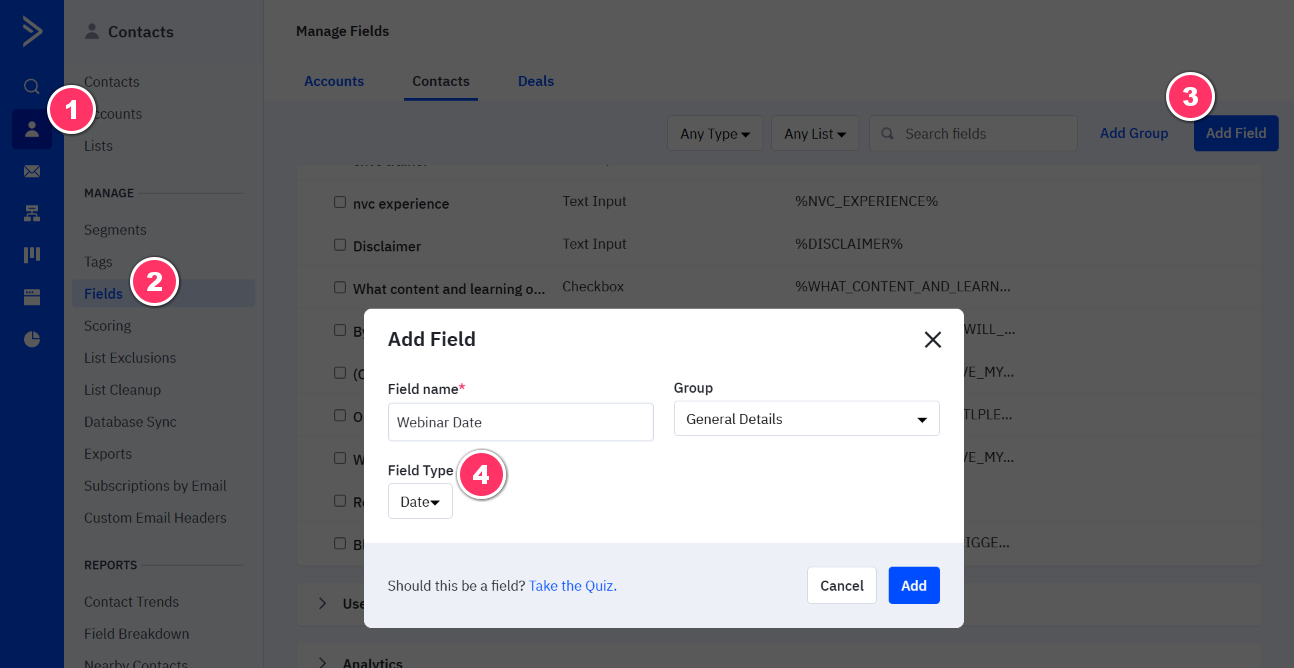
Create a new custom date field:
1: click “Contacts”. 2: click “Fields”. 3: click “Add Field”. 4: fill with details
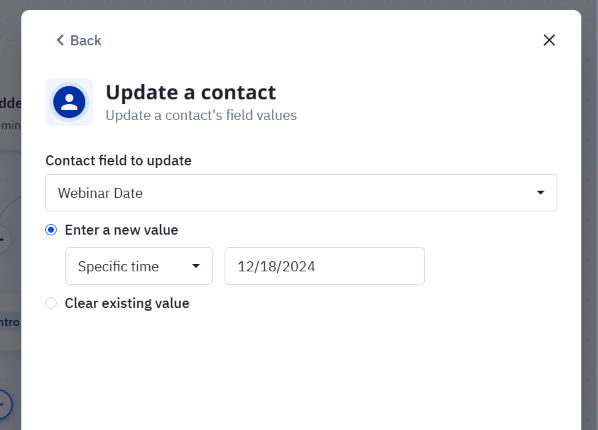
Then, add an Update contact field step to your automation, choose the new date field you just created, and set the date of your event:
In this case, I’m inputting the 18th of December as the next event date
Setting other fields to auto-insert into emails
Follow the same process as above if for any information that will change for each event.
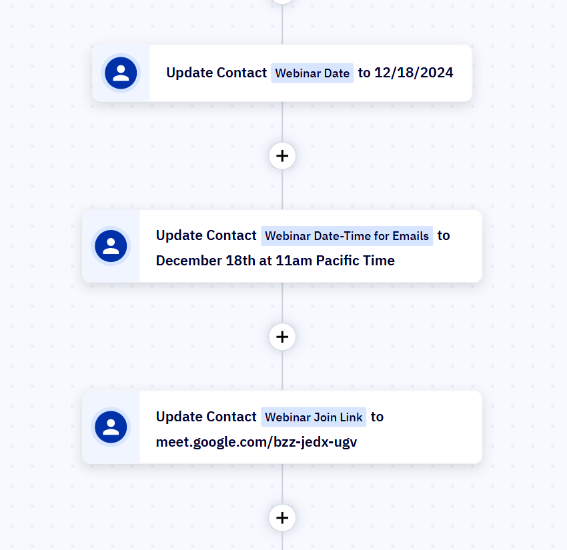
For example, you can create a new custom field to display the date and time of the event in a nice reader-friendly format in your emails. Or, if your event is a webinar and the join link will change for each event, then you could create a “Webinar Join Link” custom field.
See these examples below:
Add confirmation email step with Personalization Tags
Set up the initial confirmation email by adding a “Send an email” action step to the automation.
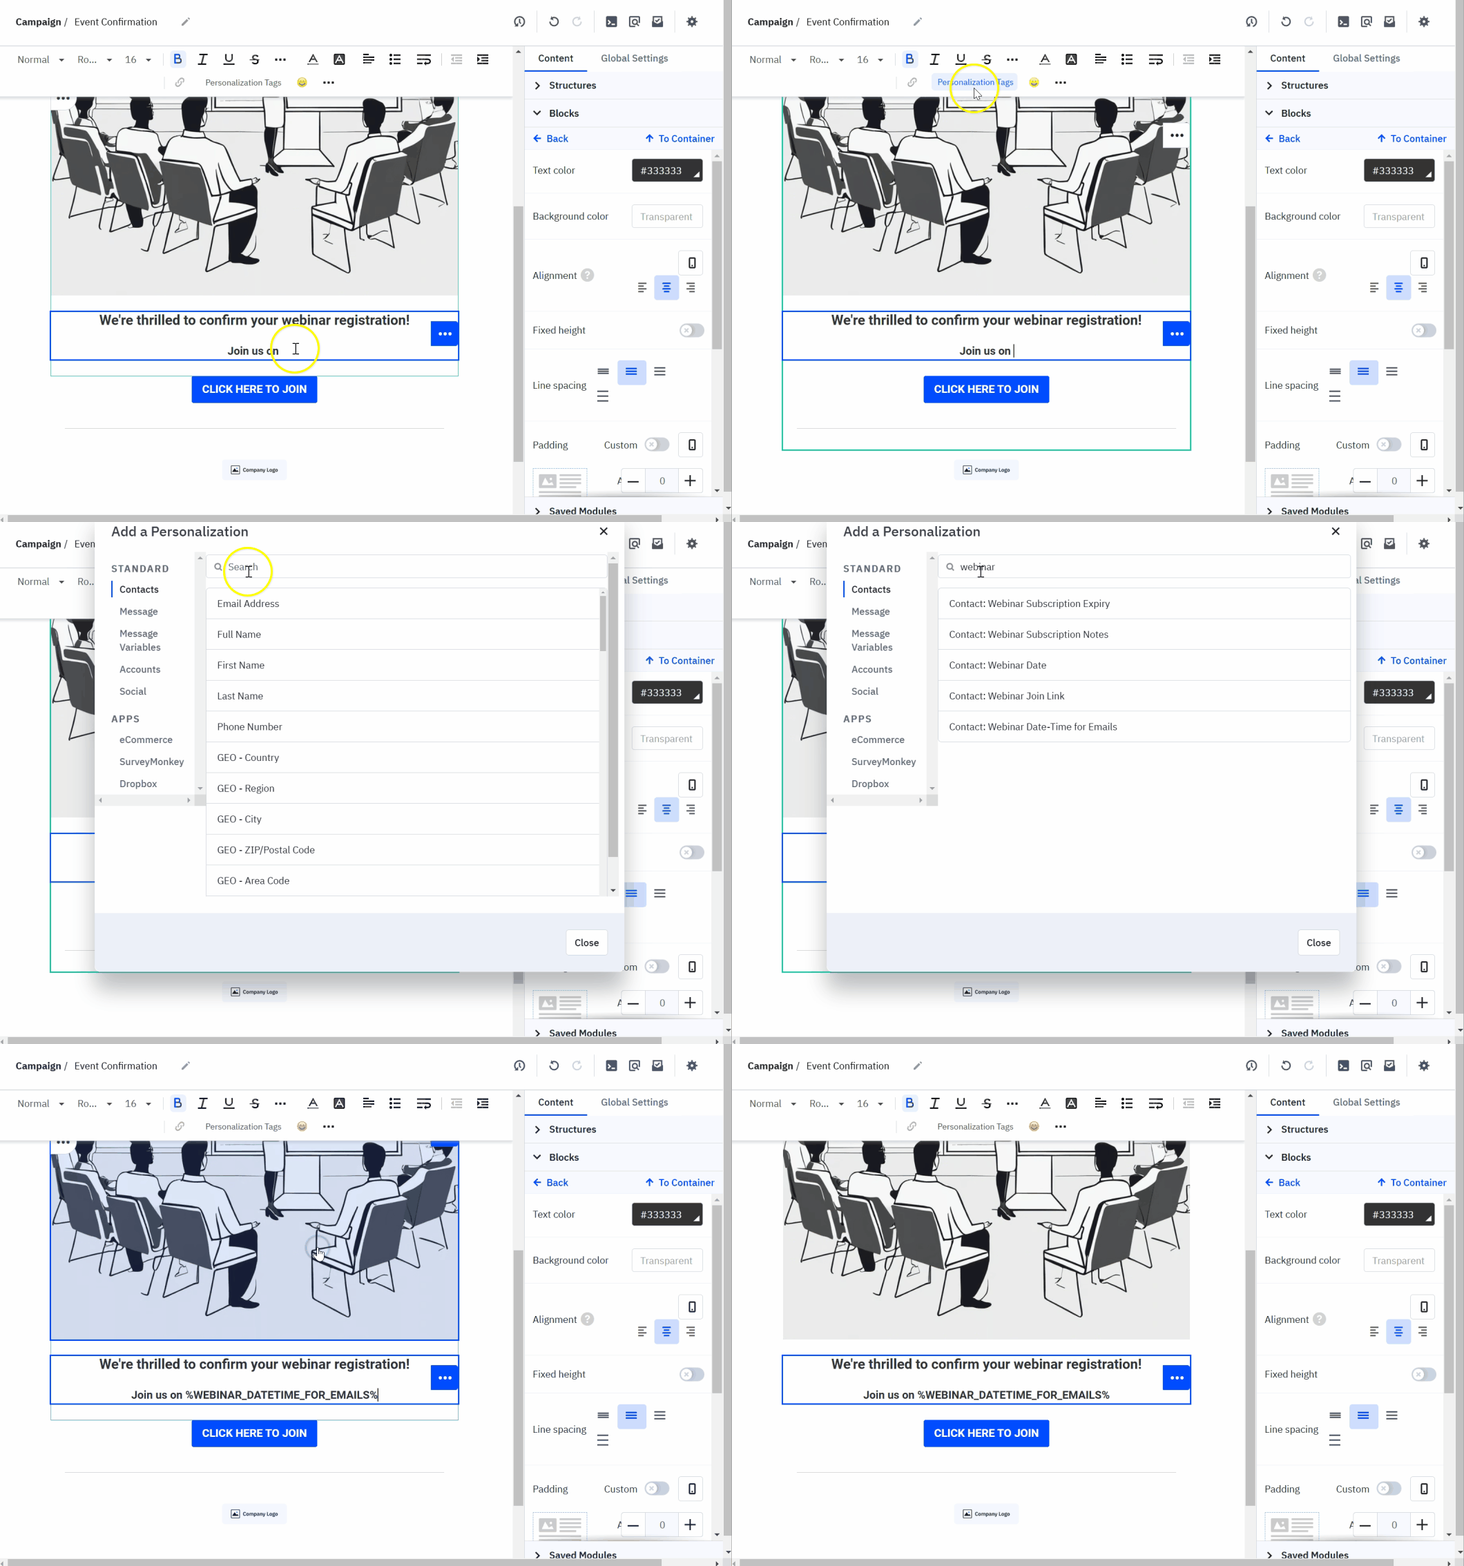
Now here’s where the magic starts to happen. You can use “Personalization Tags” to add the custom fields you created above into your email.
You can insert a Personalization Tag into an email by clicking it in the formatting toolbar:
The tag will show in the email as %SOMETHING%, but when the email is actually sent, that code will be replaced with the contents of that field.
So each event, instead of having to go in and update every email, you just need to change the custom field steps, and the automation will take care of the rest.
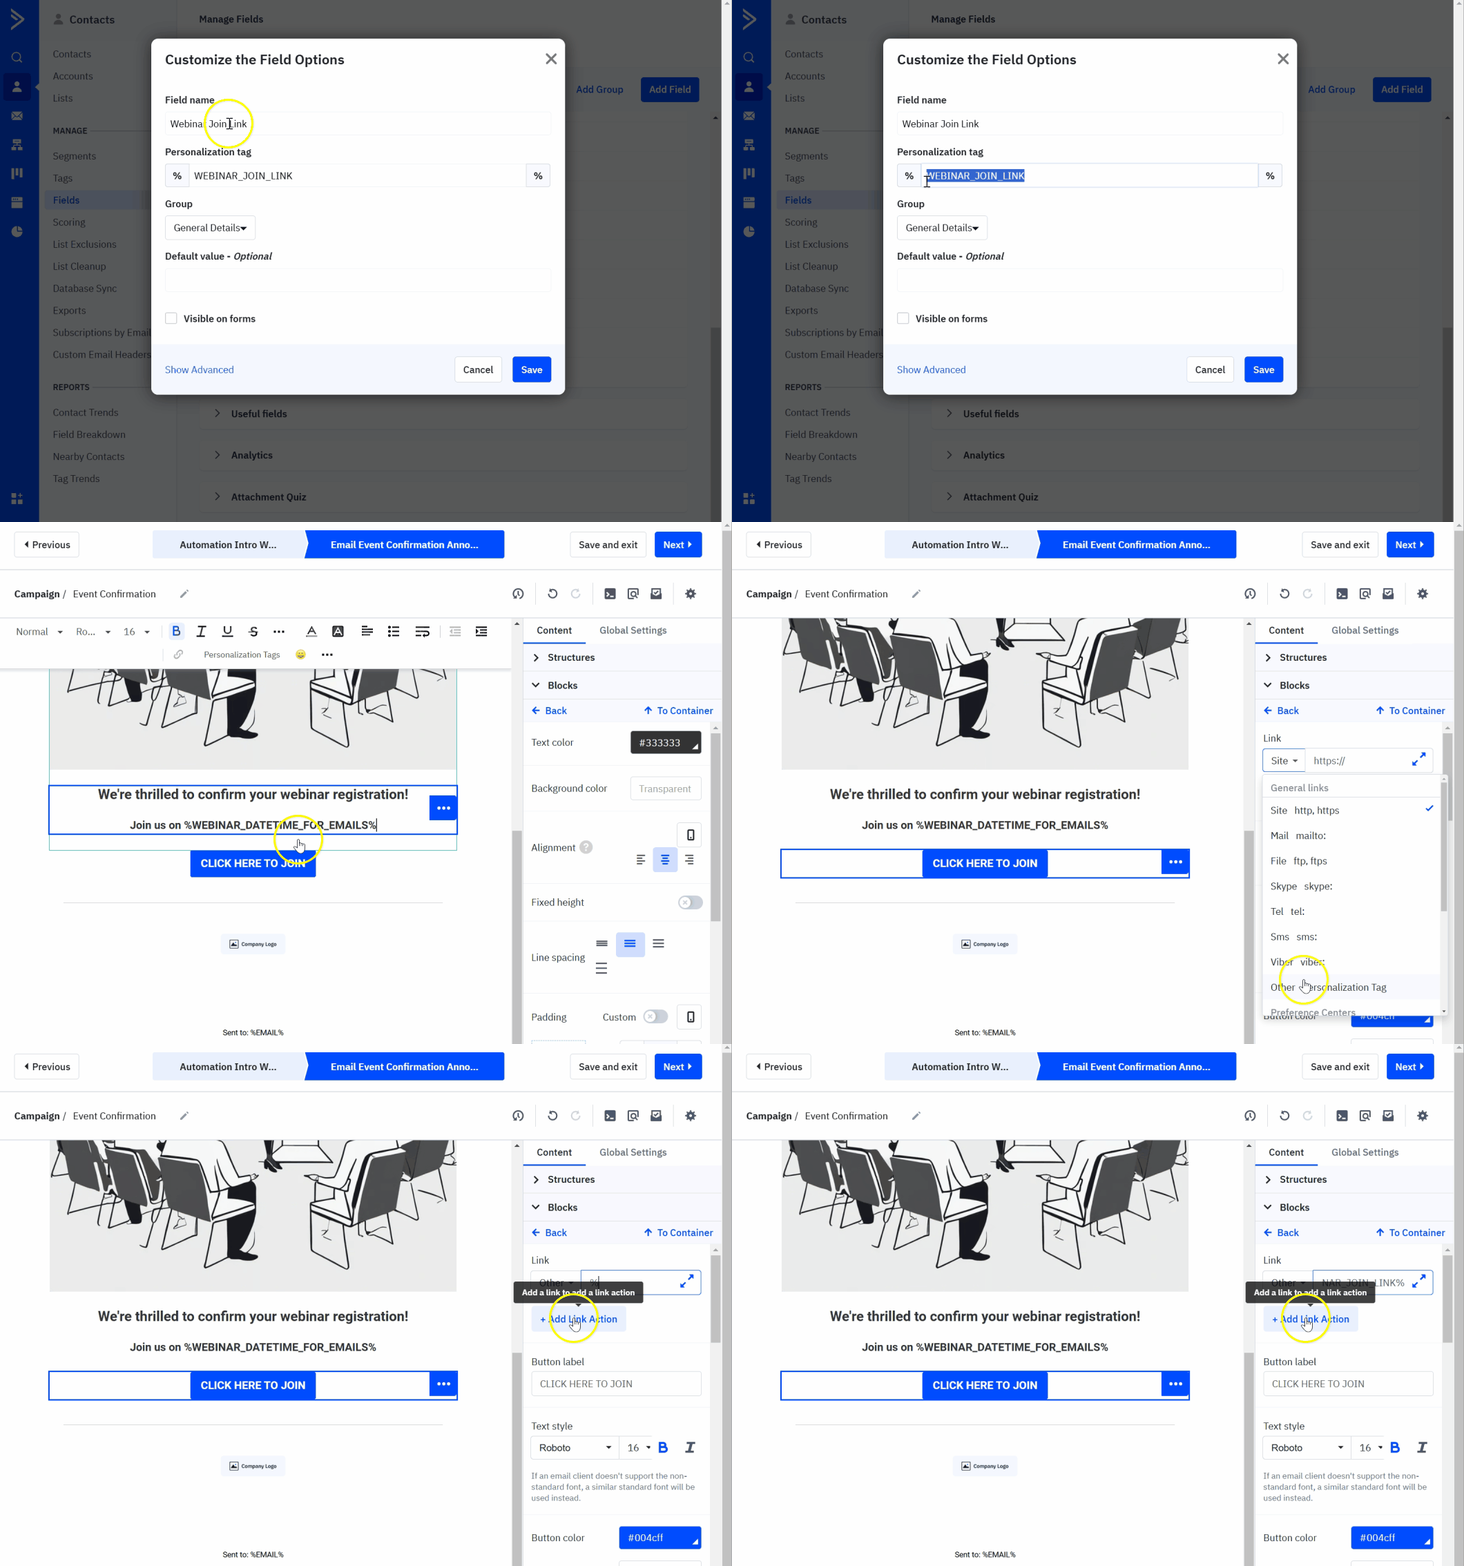
Note: if you want to add your custom field as a URL (e.g. if you’re using a webinar join link), follow this process:
Look up the field’s “Personalization tag” in your Contact -> Fields settings
Copy this into the “Link” field in your email campaign surrounded by %% (for example: %WEBINAR_JOIN_LINK%)
See this in action below:
Using goal steps to schedule email reminders
Scheduling emails is going to be a bit different from the process we followed in the first half of this guide.
In order to tell ActiveCampaign when to send your email reminders, you’re going to add “Goal” steps to your automation paired with “Send an email” steps.
A Goal is a way to make contacts wait until certain conditions are met (for example a date and time) and/or a way to make contacts skip ahead if necessary. They ensure that all contacts experience the journey you want them to, no matter when they actually register.
Goals in this automation:
Ensure that the contact always receives the first confirmation email
Receives subsequent reminder emails at the correct time
Doesn’t receive unneccesary reminders (e.g. there’s no point sending them a 2-week reminder if the webinar is in 10 minutes)
To add one, add a Goal action to your automation.
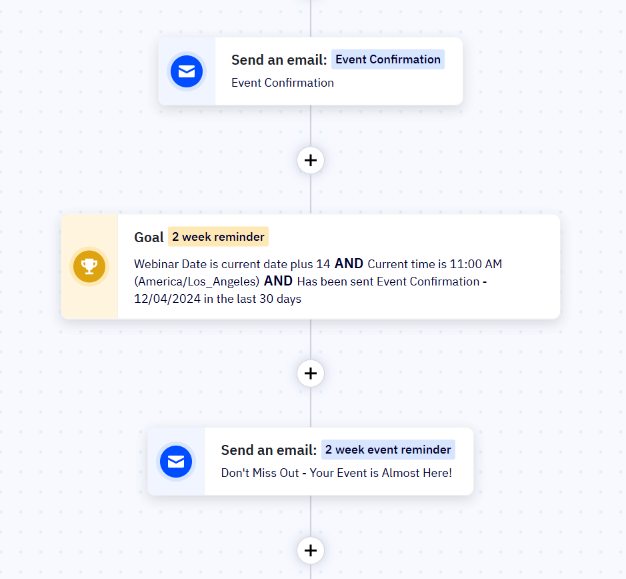
Here’s how you would set up the goal action for an email that’s sent 2 weeks before the event:
Let’s walk through this image in more detail:
1: Choose a name for the goal
2: Choose what date the goal should “trigger”
Using the custom field we created above, we can tell the goal when to trigger, and thus when the reminder email should be sent.
This condition might look a little bit confusing, but here’s how it works.
In the example above, I’m setting up a goal for the 2-week reminder. So if my event is on the 18th, the email should go out on the 4th.
Thus it should trigger when the Webinar Date field (which currently = 18) is the current date (4) + 14 days (4+14=18).
3: Choose what time the goal should fire
In the “Current time” condition, select the time of day the reminder email should be sent. Make sure the timezone is set to “My Timezone”.
4: (Optional) Make sure the contact has received the initial confirmation first
If you want to make sure a contact always receives the first confirmation email no matter when they register, add this condition and choose the confirmation email using the search box.
Note 1: that the contact will still trigger this goal, but only immediately after they’ve been sent the confirmation email.
Note 2: the number of days should be the maximum number of days someone can sign up before your event starts (e.g. the number of days between when registration opens to when the event occurs).
5: Set the goal to wait
Make sure the goal is set to “Wait until the conditions are met”, or the automation won’t function correctly.
Add email below the goal
Add a new send email action directly below the goal you’ve created - this is the email that will be sent immediately after a contact matches the goal conditions.
Design the email as you like, and remember to add Personalization Tags as needed (see the heading “Add confirmation email step”).
Repeat for each pre-event email you want to send
Simply keep adding a new goal, and then a new email action step, until you’re happy with your pre-event emails.
Add an “Event start goal”
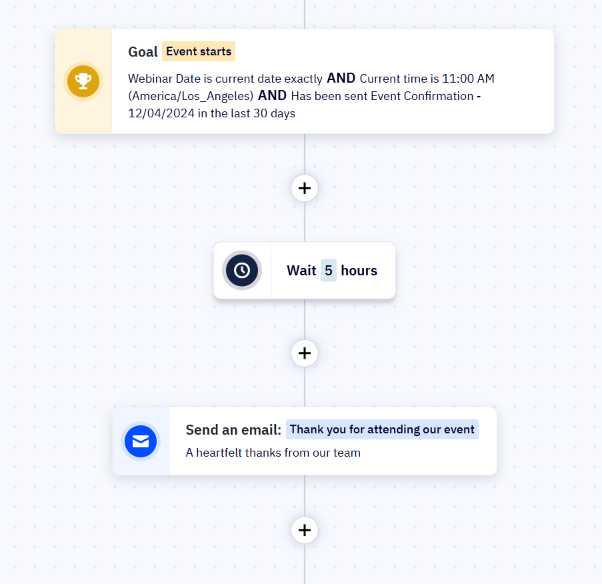
I recommend adding a goal the same as above, but timed to the start of your event. This will aid you in timing your post-event emails (see below).
Important Note: if your automation is already Active when you add or modify a goal, always make it Inactive and then Active again
Post-event emails
After the event is complete, you can use simple Wait steps to time your post-event emails.
This is where adding the Event start goal mentioned just above can be helpful - it helps you time your post-event emails.
Cleanup steps
Once the event is over and any remaining follow-up emails have been sent, we need to “reset” the automation for the next event.
To do this, add steps to clear any contact values that the automation set earlier. This ensures there will be no conflicts if the same person signs up for future events. Add them to the end of your automation, like this:
Optional but recommended: add a “late signup” branch
If people can still register for the event even after it has started, I highly recommend adding a “branch” to the automation specifically to handle them. This is because:
It makes for a good user experience to acknowledge that someone has signed up late - and may need different instructions to attend
It helps keep the automation clean by preventing contacts from getting stuck
To do this, add an If/Else branch just above your first registration confirmation email.
We want to make sure that everyone who signs up before the event starts, matches the conditions (which means they will go to the left branch of the automation).
Set the conditions following the image below:
1: this condition makes sure that anyone who signs up any day before the event, will match
2: this condition is to make sure that anyone who signs up on the day of the event on or before the time the event starts, will match
In the example above, we have a webinar that starts on the “Webinar Date” (the custom field we set previously), at 11am. Everyone who signs up until 11am should receive our regular confirmation series, and everyone who signs up after should receive an alternate confirmation email (e.g. “The event has already started! You may still be able to join us”).
Condition set (2) makes sure that anyone who registers any day before the webinar receives the usual confirmation, and condition set (1) makes sure that anyone who registers on the day of the webinar but up until 11am, receives the usual confirmation.
Anyone who doesn’t match either of these conditions will receive the alternate confirmation.
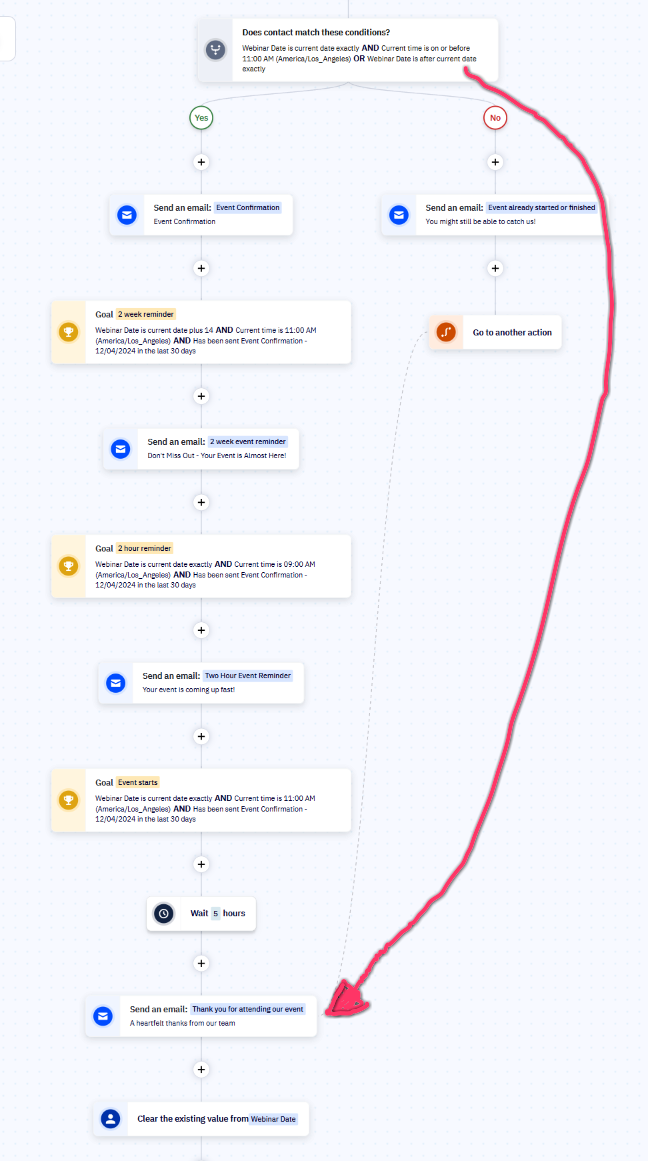
In the new right branch of the automation, add your alternate email, AND make sure you add a “Go to” step which joins the branch up with the rest of the automation.
You want your "Go to” step to join up before the Contact field clearing steps mentioned above. Even better - you may want it to join above the post-event emails (e.g. if you have a webinar recording that you still want to send to anyone even if they sign up after the event).
Here’s the branch fully laid out - note how any late registrant receives a different email, then is automatically pushed to the “Thank you for attending our event” email step, where it will join the first branch and receive this thank you email, as well as going through the subsequent steps that clear the contact fields.
How to set up the next event
The whole of the automation will run itself except for one manual task you’ll have to do for each event - updating the automation’s “Update contact” steps.
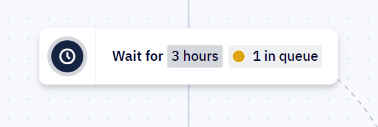
I recommend making sure that an event is over and all contacts have completed the automation before making these changes. You can tell if anyone is still waiting at any Goal or Wait step by looking for “X in queue”.
Note: check out my article on troubleshooting automations for further help with this.
Then, when you’re ready, simply go into each Update Contact step, and update the fields. For example, you’d update the “Webinar Date” step with the date of your next event.
Note: If your event is taking place at a different time, you’ll also need to update the “Time of day” condition in your goal steps (remember to always turn the automation Inactive and then Active again if you modify a goal).
You can also take this opportunity to make changes to any of the emails in the sequence (for example to improve them).
With everything updated, your next event is ready to go! (I recommend turning the automation inactive and then active again just to make sure everything works).
Now, when people register for the next event, they will enter the same automation, but their custom fields will be updated with the new data, which will not only send the emails to them at the right time, but also automatically insert that new content into your emails.
Summary
By leveraging the power of ActiveCampaign’s automation and campaign features, you can create a seamless, engaging experience for your event attendees. Using the guide above, you’ll be able to effectively engage every registrant, sending emails that boost attendance and build extra value.

