How to personalize your ActiveCampaign emails and automations
Email personalization is a strategy to deliver unique emails to each of your subscribers depending on their unique characteristics and preferences. A common example is to personalize each email with your subscriber’s name, but that’s just the tip of the iceberg.
In the end, the goal is to show your subscribers content that’s more relevant to what they actually care about, resulting in:
Increased trust & engagement - your subscribers feel like you’re listening to their needs
Increased revenue - your subscribers are more likely to buy when your efforts are focues on what they actually want
And the statistics clearly back this up - consumers are hungry for personalization, and tapping into this results in increased open rates, engagement, and revenue.
So if you use ActiveCampaign, and you’ve been wondering how you can use personalization to drive more results from your email marketing, you’ve come to the right place.
This guide is built specifically for ActiveCampaign users, and will show you:
how to start collecting preference information from your subscribers
how to send targeted campaigns based on subscriber preference
how to personalize automations based on subscriber preference
Note: if you’re looking to personalize your emails with your subscriber’s name, that’s easy peasy - ActiveCampaign has a guide right here. This article will be diving into some more in-depth ways of using personalization.
How to collect subscriber preferences
There’s a few ways you can track your subscriber’s preferences with ActiveCampaign - by directly asking them, automatically tracking it, or manually adding it:
Which method should you use to track preference data in ActiveCampaign?
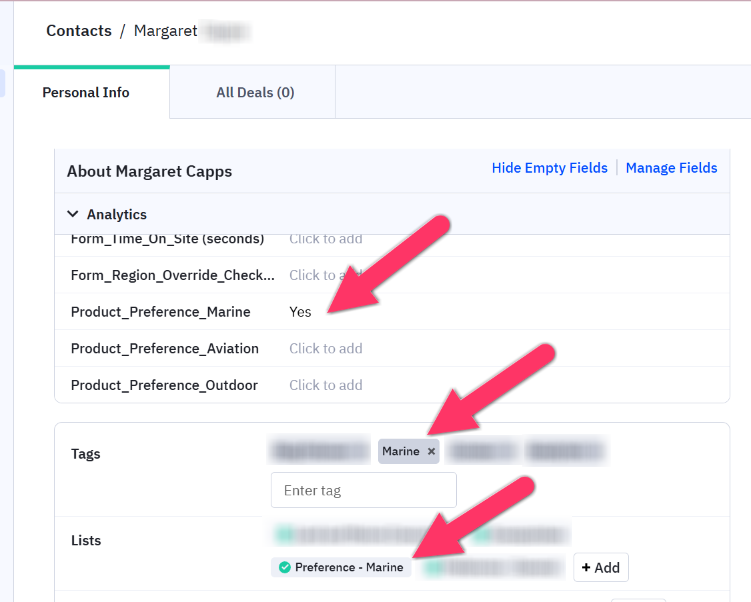
How you actually track preference data in ActiveCampaign can be done in a few ways:
Track preference by email list subscription
Track preference with custom fields
Track preference with tags
A contact page showing three ways to track a preference for “Marine” products. From top to bottom: tracking via custom field, tag, and list.
I recommend using subscription lists, because they’re intuitive to most (if I’m subscribed that means I’m interested), and they work more naturally with ActiveCampaign’s preference center (which I’ll come to later).
But, tags and custom fields also work well, and depending on your unique ActiveCampaign setup they may be a better solution. Note that you can absolutely mix different methods for different preferences. And, if you need to, you can use automations to convert preferences from one kind to another (e.g. convert tags into lists).
Looking for help crafting your personalization strategy? Grab a time on my calendar
Collecting subscriber preference with an opt-in form
One of the simplest ways to understand your subscriber’s preferences is to simply ask them when they sign up via your website.
Whether your opt-in form is built using ActiveCampaign’s own form tools, or using a third-party app, make sure that this preference is mapped into ActiveCampaign as a list subscription, a tag, or a custom field change.
An opt-in form specifically asking for shoe brand preference.
Adding preference links to your emails
You can also track preferences based on the links that people click in your emails, which is a great way to gather information from your existing subscribers.
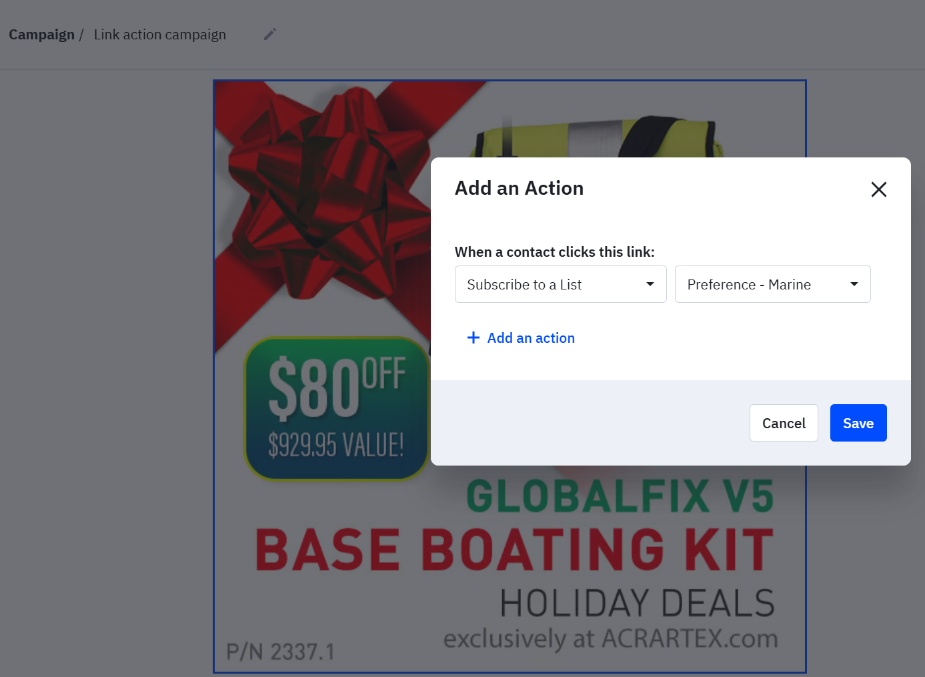
ActiveCampaign’s “link actions” feature enables you to automatically subscribe contacts or a add a tag when they click a link.
So by adding a link action to any blog or product links in your emails, you can easily track preferences (remember that images can also have links). For example, clicking an image of a Nike shoe in your email activates a link action to track a preference for the Nike brand).
Note: link actions cannot update custom fields. If you’re tracking preferences with custom fields, you will need to track the preference with a list or tag, and then convert that to a custom field change using automation.
To add a link action, follow this ActiveCampaign guide.
An example of adding a link action to this email image to mark a preference for Marine products.
Using ActiveCampaign’s preference center
ActiveCampaign's preference center offers an easy way to let your subscribers manage their own preferences.
Note: this feature works best if you’re tracking preferences via lists. If not, you will need to use automation to convert list subscriptions into tag or custom field changes.
It’s essentially a simple page that you direct subscribers to by adding a link to any of your ActiveCampaign emails (campaigns or automations). There, subscribers can update their preferences seamlessly by selecting checkboxes for which list they want to subscribe to.
The preference center is handy because it’s an all-in-one place for your subscribers to manage their information.
Here’s ActiveCampaign’s guide on setting up your preference center.
Note: with the preference center, you can customize the names of each list so that the subscribers see something relatable (i.e. rather than the actual list names you use behind the scenes)
Automatically tracking preferences with website/purchase tracking
Your subscribers are often taking other actions on your website which can help you deduce their preferences, and ActiveCampaign’s site tracking and eCommerce integration features enable this to be tracked automatically.
See the image below of an automation that tracks preference using two automation triggers, and read on below for how to use each one:
Website page visits
eCommerce store purchases
Tracking website page visits
In order to track your subscribers on your website, you will need to install ActiveCampaign’s tracking code on your website (here’s the instructions).
Once this is set up, ActiveCampaign will track each time a subscriber visits any page on your website.
To turn this into preference information, you’ll want to think about which pages on your website could help you deduce an interest.
As an example, say you know that if a subscriber visits any page on your website with “marine” in the URL, you can infer that they’re interested in your marine products.
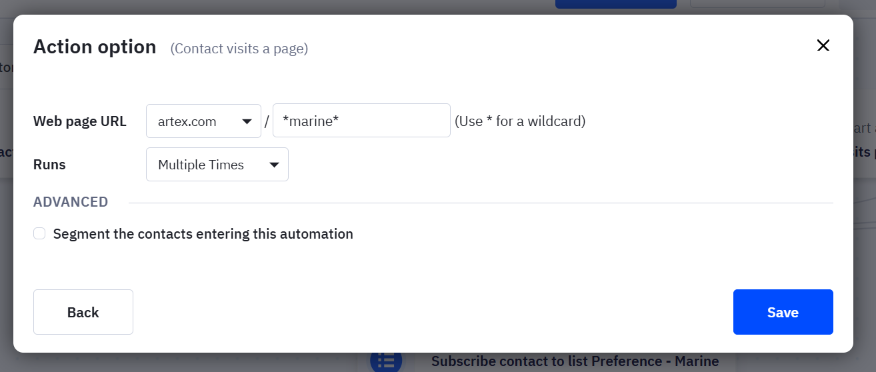
To implement that tracking, we’d use the “Contact visits a page” automation trigger, with these settings:
Note: you can use an asterisk (*) as a “wildcard”, which means that the URL can contain anything where the asterisk is placed. In the example below, “marine” can be anywhere in the URL, and it will still trigger. So whether the URL visited is artex.com/marine, artex.com/products/marine, or artex.com/marine-blog, they will all trigger.
Tracking eCommerce storepurchases
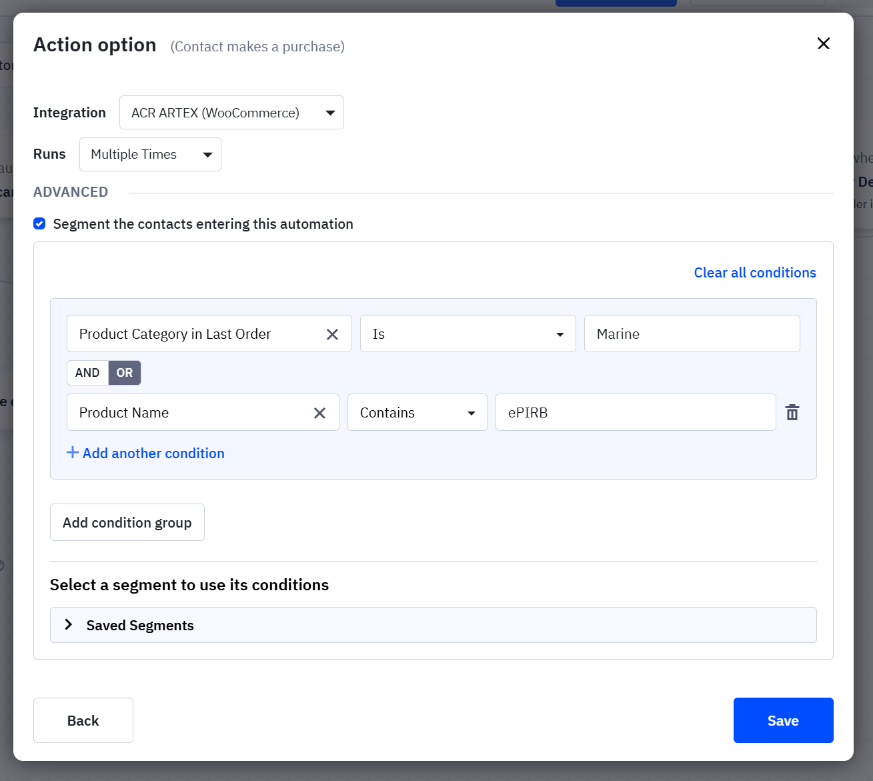
You can also use ActiveCampaign’s eCommerce integrations to trigger automations when someone purchases a product. Similarly to the page tracking above, simply set up the trigger to choose which products correlate with a specific preference.
In this example, any product in the WooCommerce “Marine” category, or that has “ePIRB” in the product name, will trigger
Manually updating preferences using past data
All of the methods above only work for any activity that happens after you implement them. But there could be a wealth of data you already have that indicates preference data in some way.
For example, above I showed an automation that tracks preferences when someone visits a specific page or purchases a specific product. But what about all of your existing subscribers who have already done that in the past?
You can manually update those contacts by filtering for them in ActiveCamapign’s contact search, and applying the preference in bulk.
To do this:
go to your contacts page, click the search box, and click “Advanced Search”
fill out the conditions to filter for the contacts you want
click “Search”
click “Edit all” and apply the corresponding preference (e.g. a list subscription, tag, or custom field change)
The image below shows how you’d take these steps to mimic the automation mentioned above:
If you have data from external files (e.g. spreadsheets) - just import the data into ActiveCampaign, and follow the steps above to assign preference.
Sending targeted campaigns based on preference
So now you’re tracking the preferences of your subscribers - how do you use this to personalize your emails?
One way is to send a campaign just to a subset of your audience (called a segment). Continuing the example running through this article, my client’s two main product offerings are safety beacons for hikers, and safety beacons for boaters. They want to run a campaign promoting some great discounts on their products.
Rather than creating one campaign that tries to appeal to both audiences, we could use the preference data we’ve tracked to create 2 campaigns: one highlighting specific discounts for hiking products, and one highlighting discounts for boating products.
And here’s where you get to have fun with personalization - you can create two emails that are specifically relevant to each target audience, which enables you to use more specific language, images, and design.
Compare the two emails below:
Note how the images, copy and products offered are completely different. Each email speaks directly to one of your audiences. This is the power of personalization.
To set this up in ActiveCampaign, you’ll need to create “segments”. These are subsets of your email list that you define with various conditions. Check out my guide on how to create segments, or if you already know how to use them, here are two condition sets we would use to send these targeted campaigns:
This is the condition for the email that will sent to boaters (Preference - Marine).
This is the conditions for the email that will be sent to hikers (Preference - Outdoor).
Note that the second condition set excludes people with a boating preference. This is because otherwise people who have preferences for both boating and hiking would match both condition sets, and receive both emails. It’s my recommendation when sending personalized campaigns to make sure there’s no overlap between who receives each email - but this is up to you.
As a more complete strategy, you could instead create three emails:
boating preference
hiking preference
both/neither preference
The third email contains content directed at both audiences, and is important to prevent alienating people who you just haven’t been able to gather their preferences yet.
To do that, here’s how the conditions for each email would look:
Conditions for the boating-targeted campaign.
Conditions for the hiking-targeted campaign.
Conditions for everyone else (either both preferences, or neither preference).
You can see that the conditions start to get more complex, and there are limitless options for you to segment and personalize each email!
But when you’re starting it out, feel free to keep it simple. If all the conditions above are overwhelming, don’t worry - you can keep it as simple as just sending one email targeted to one group (for example targeting your paid members with some special member-only offers).
No matter what personalization strategy you use, it’s important to see if the effort was worth it.
Checking your strategy is working
Once you’ve sent your campaign(s), take a look at the results after 1 week to see if your personalized campaign strategy worked (within 1 week is the timeframe that the majority of recipients will engage with your email).
What are the open rates, click rates, and revenue of each email? How do they compare to previous campaigns that weren’t segmented?
To see the results of your campaigns in ActiveCampaign, go to:
Campaigns icon on the left sidebar
Click “All Campaigns”
Revenue is the best measure of success, so if your store is connected to ActiveCampaign, here’s what to look for:
is your Revenue number divided by your Sent number (i.e. $ per sent email) higher than your non-personalized campaigns
is your Revenue number higher than your non-personalized campaigns, AND is it worth the extra effort spent
Some example results - note how the bottom two emails were sent to less contacts, but had higher $ per email and similar total revenue.
If you don’t have access to ActiveCampaign’s Revenue stat, try comparing open and click rates instead, or examine website conversion metrics via a tool like Google Analytics.
Just like with any new strategy, I recommend trying out your personalization a few times to account for variation in the results. With the results of a few sends under your belt, you can analyze whether the strategy is working, whether it’s worth the extra effort, and how you can fine-tune or alter your strategy for greater success.
Splitting your welcome series to send personalized emails
Campaigns aren’t the only way you can personalize your emails - automations are just as lucrative. And similarly to campaigns, segmenting your automations based on subscriber preference enables you to deliver more relevant content to your subscribers, and get greater ROI out of email marketing in the process.
I recommend starting with your welcome series when it comes to personalization because:
it’s usually the first emails someone will receive from you
it’ll usually have the highest open/click rates of any emails you send
every (new) subscriber will get it
So by personalizing your welcome automation, you can make a fantastic first impression, and get more bang for your buck than most other automations.
Let’s do a quick recap of what a typical welcome series looks like. The image below shows how a contact triggers the automation when they subscribe, are sent an email as soon as they sign up, and then wait in each of the “Wait” steps so that they receive an email every couple of days.
Personalizing your welcome series
Now let’s take this basic automation and personalize it.
To guide you in setting up your automation, let’s continue the example I’ve used above - one of my clients sells emergency locator beacons. Their customers might be boaters or hikers, and my strategy is to increase purchases by showing their new subscribers content and products related to being at sea (boaters), or being on land (hikers).
To achieve this, I’m going to walk you through a simple two-branch automation that looks like this:
Click image to enlarge.
Here’s the flow: when someone subscribes, ActiveCampaign will check if they’re subscribed to the “Outdoor” preference list. If they are, the contact will move down the left branch, and will receive emails containing hiking-oriented content. If they are not, they will move down the right branch, and receive emails containing boating-oriented content.
Already with this simple automation, we’re showing subscribers content directly related to their interests. Hikers aren’t being distracted by boating saftey equipment that they don’t care about, and vice versa.
Using If/Else steps to create branches
ActiveCampaign allows you to divide your automation into branches by using “If/Else” steps.
If/Else works based on conditions that you define - when a contact reaches an If/Else branch:
IF the contact matches the conditions, it moves down the Yes branch (to the left)
ELSE, if the contact doesn’t match the conditions, it moves down the No branch (to the right)
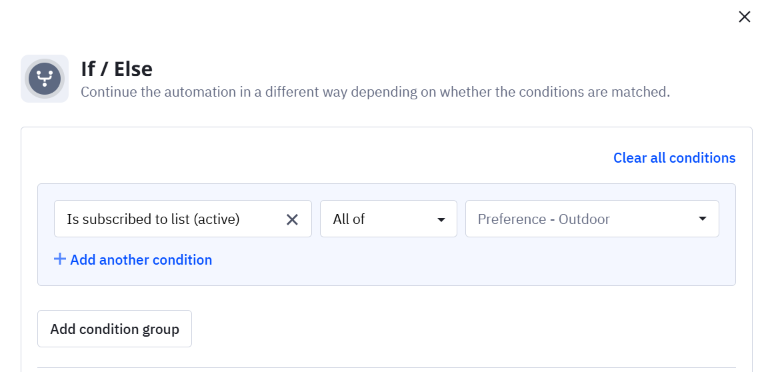
Here’s the If/Else conditions that are used in the automation flow above:
In this case, the conditions say: IF the contact is subscribed to the “Preference - Outdoor” list, they will meet the conditions and go down the left branch, otherwise, go to the right branch.
Looking at the example automation, you may have noticed that if someone isn’t subscribed to any preference list, they will go down the right branch and receive boating emails (even though they may actually only care about hiking). And, if someone has subscribed to both preference lists, they’ll go down the left branch and receive hiking-related emails (even though they might also be interested in boating content).
This is something to think about when building your automation - how do you treat subscribers with no preferences, or more than one preference? If you don’t cater to these, you may alienate some subscribers with irrelevant or incomplete content.
To avoid this, let’s add a third branch to the automation. The emails in this branch contain both hiking and boating-related content in the same email. The easy part about adding this branch is that you probably already have these emails set up (i.e. they’re your original welcome series).
To add the branch, you’ll need to add another If/Else step above the existing branches - like this:
(Click image to enlarge) The branch on the left is taken when a contact is subscribed to BOTH preference lists, or NEITHER. This branch would contain emails that contain broad content aimed at both audiences.
How to set up the conditions for the new branch. Note the use of the “All of” condition - which means that a subscriber only meets the conditions when they’re subscribed to “All of” Preference - Marine AND Preference - Outdoor, or, they’re not subscribed to “All of” those same lists.
Add unique emails to each branch
Now here’s where the personalization comes in - you are going to craft the emails that go to each branch so that they are personalized to that subscriber.
In our example, we have two branches - hikers, and boaters. Think about how much potential that opens up in how we write the emails, and the images we put in them. Rather than speaking generally, we can use language that hikers or boaters specifically use, and images that specifically relate to them:
See how in one branch, the email contains an image of a boat at sea, whereas the other branch contains an image of a hiker on a mountain. The copy of the email is also targeted to each audience.
Measure your results
Similarly to sending personalized campaigns, you’ll want to monitor how well your new automation is performing.
Getting results for automations is a bit more finicky than for campaigns, but you can follow ActiveCampaign’s guide to find them.
Just like the personalized campaign analysis discussed above, run the new welcome automation for a month or more, then compare the results of each email.
Revenue is the best measure of success, so look for:
is your Revenue number divided by your Sent number (i.e. $ per sent email) higher than the non-personalized email
if there is an increase in Revenue, was it worth the extra effort spent to set up the personalization
If you’re store isn’t connected to ActiveCampaign, you won’t see a revenue number in your reporting, but you can try comparing open and click rates instead, or measuring conversions via webiste analytics (e.g. Google Analytics).
Use the results to decide if this strategy was worth the effort.
If you didn’t get the improvement you were expecting, you might have more luck catering to a different set of audiences (e.g. segmenting by age, location or gender rather than product preference).
If you did get an improvement, you can continuously work on your automation - fine-tune each email in a path, or add more branches to enable further personalization. You can also extend petsonalization to other automations - in particular, I recommend applying this to your post-purchase automation.
Extra thoughts
Conditional content vs Branching
If you have heard about ActiveCampaign’s “conditional content” feature, then you might be wondering why I haven’t mentioned it as a method for personalization. Basically, conditional content is a way to hide and show different content within an email depending on people’s preferences.
The reasons I don’t recommend it (especially to start) are that it’s harder to analyze the results. It’s also not as intuitive nor flexible as campaign segmentation and automation branching. I do see it being useful for small bits of personalized content where a personalization tag won’t cut it, or for A/B testing, but overall, I recommend the methods in this article to start with.
How complex should your segmentation be?
This is a great question that many clients don’t think about when they come to me, but is so important. See, it’s easy to go down a rabbit hole with personalization.
For example, I might hear something like: “I want 6 different branches for this welcome series for our 6 different product types, oh and if they click this link, I want them to receive another email with 3 variations depending on the season of the year”.
It is fun to think about all the ways that you can deliver unique emails to subscribers that really speak to them.
But, you’ve got to consider effort vs results. Creating 1 email is hard enough, let alone 6 different variations of each email. And whenever you segment your emails, you’re spending more effort for less eyes (i.e. you have to create more emails, yet less people will see each one). So you want that effort to be worth the potential results.
I recommend keeping things as simple as possible to start: create 2-3 variations like in the examples I gave above. Repeat the experiment a few times in the case of campaigns, and in the case of automations, run it for at least a month).
Then, track your results: do you see more opens, more clicks, more revenue? Do the results feel like they were worth the extra effort? If so, then you can choose to make segmented campaigns part of your regular strategy, or add more branches to your automations, etc.
Summary
Email personalization is a powerful tool that can surprise and impress your subscribers, and set you apart from your competitors. But it is an extra effort, and like any other marketing strategy, should be used carefully.
If you’re interested in trying out personalization, I recommend creating a simple plan, sticking to it for a few goes, analyzing the results, and making changes based on the data.
And if you’re reading this and thinking you might need some help with any part, please don’t hesitate to reach out and book a time on my calendar - I’m always happy to hear the fun ideas people have in mind!
This article was created with help from my amazing assistant Daniel Navarro.

